- Download and instal Mi SPHERE CAMERA app from App Store or Google Play.

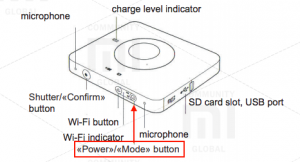
2. Turn on your camera – press the POWER/MODE button to turn the camera on.

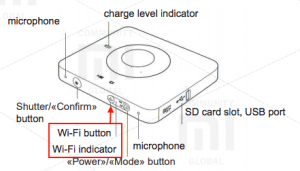
3.Turn on WiFi – press the WiFi button once. The light indicator will come up.

4. Connect Camera to your mobile phone’s WiFi.
5. Go to Settings/WiFi and Select the SSID of the camera from the network list – something like “MIJIYX”
6. Enter the password. (in this case “12345678”).
7. Go to your Mi SPHERE CAMERA App and you can start taking pictures.
8. Once you have your panoramas in the app, TRANSFER THEM TO YOUR PHONE FIRST.
YOU CAN NOT DOWNLOAD PANORAMAS TO YOUR PHONE DIRECT FROM THE CAMERA AS THEY WILL NOT BE “STITCHED” INTO AND EQUIRECTANGULAR PANORAMA !
MI SPHERE CAMERA MANUAL

- The MI SPHERE CAMERA camera has an Android and an iOS app, but full resolution is limited to smartphones with powerful enough processors. Check your phone on this table.
- The camera has auto, manual, shutter and ISO priority modes.
- It also supports up to 32-second exposures for motion blur photos.
- The Mi Sphere has a DNG raw mode, but can also capture both raw and jpeg files at the same time.
- There’s also a bracketing mode (3, either .5 or 1 EV apart) for HDR photography. This is available above the shutter on the shooting screen.
- The camera can record for up to 90 minute of HD video on one charge before overheating in most conditions. It can also be used while connected to a USB power source.
- For best video quality, use the high-bitrate video mode, available in settings under video resolution.
- Although the camera’s 6-axis electronic image stabilization is good, for even better stabilization, consider using a gimbal.
- To use the electronic stabilization properly, turn the camera on, holding it in a vertical position, and wait for the gyro to warm. The camera has to be upright when you start recording for the camera to know which way is up.
- The camera has an IP67 water resistance and dust-proof rating, but it isn’t actually waterproof, more like splash-proof.

